{Photoshop for Digiscrappers} Digital Facelift
I've been posting every now and then some tips and tricks over at the ScrapArtist blog. I'm reposting some of them here. I am in no way a Photoshop expert. It's all self-study. All of the tips and tricks I've shared are all related to help us digiscrappers.
(original post date: 19 December 2009)
Hi everyone! Hope you’ve had a good weekend. My quick tip for you today is a way to soften and smooth out skin in pictures. It’s a way to get a facelift without the pain of surgery or Botox. ;)
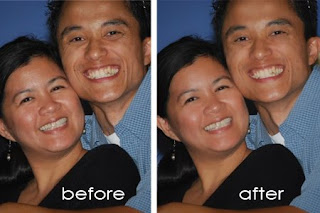
Here is a picture I like of me and my husband, except that I’m not too thrilled about the condition of our skin. So, photoshop to the rescue!

1. Open your image and duplicate the layer (Ctrl/Cmd+J)
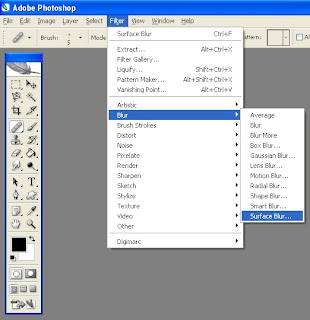
2. Working on the duplicate layer, go to Filter>Blur>Surface Blur

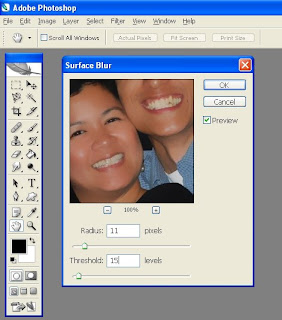
3. For the Threshold value, use something between 11-15; Radius: 15-20. You will get a sort of painterly effect.
 4. Reduce the opacity of the layer to your liking. I reduced mine to 50%. I wanted the effect to be subtle and have the picture still look realistic.
5. Flatten the image (CTRL/Cmd+E). You can stop here if you’re happy with your image.
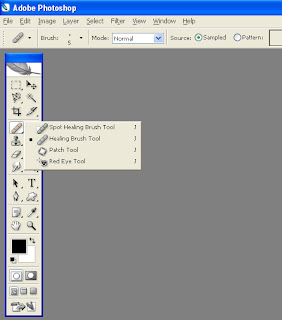
6. For my picture, I wanted to cover up some of the darkness under the eyes so I’m using the Healing Brush Tool. Choose a brush size to suit the areas you will be working on.
 7. Pick a sampling point by positioning your pointer on a part of your image that has about the same qualities as the area you want to cover up, then ALT+click/Option+click. (I used a point in our foreheads) Brush away the bags under the eyes and other imperfections you want to correct. If you find that it’s not matching the surrounding areas, just choose another sampling point.
8. Here’s my before and after image for comparison.

Hope you enjoyed our little trick for a virtual facelift today. Have a fabulous day!


0 comments:
Post a Comment